The snow, visitors and business pressures have not been able to slow down the momentum that's building up now that all the decision making is behind and we're starting to really get stuck into the restoration and installation of new equipment. With a burst of activity from the chippie and others from HYC, who are now fully engaged, things are starting to happen.

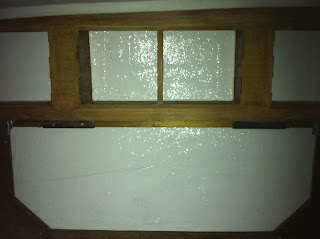
James, the carpenter, made up a pattern then cut out the new panel that covers the old, tatty woodwork where the antique vhf and switch panel used to be. It fits perfectly so with the instruments loose fitted has started to give an impression of what the Navigation area will start to look like when finished. There's just enough room for everything except the Navtext which will be have to fit on the access panel for what was once the bookshelf and will now accommodate fuse boards and bits of electronics. In addition to the VHF, Plotter & circuit breaker panel there is the Tank Tender to check fluid levels, a panel for lighting and the remote controller for the power supply. After a couple of coats of varnish it will be ready to be wired up

Paul, who's a shipwright, has got started on the galley by ripping out the top and interior dividers revealing how much space there was hidden away underneath, much of it inaccessible. A rather extensive area of bulkhead bonding that had delaminated has now been re-built and the ply top is almost ready to be fitted. Once this is done the cold box can be constructed by the GRP expert, Arron, and the sink fitted with both the mixer and drinking water tap. We're hoping that the Seagull IV filter that will be hidden underneath will make the water palatable despite the inevitable osmosis in the tank. It will be finished off with a Corian top and new fiddles. With the top off it's clear that there's plenty of space behind the cooker for the little Waeco compressor unit, looks like we'll be able to arrange plenty of air flow for it too which is a relief.
I've managed to finish off the ducting for the wiring from the nav area to the forepeak and back to the base of the mast; it may seem simple but it too ages to make up and fit packing pieces to support the ducting. It's quite large as there are rather a lot of cables to accommodate including two large DC wires to the forward batteries, co-ax for the VHF, NMEA 2000 cable, 5 core cable for the mast and reading light power. The new Contest 130 compasses are now fitted making the cockpit look much smarter and updated but still in a manner consistent with the original feel of the yacht.
There's been a lot of activity in the Yard as everyone realises that there's not much time left before Easter and lots to do, getting a parking space is proving difficult. There was a bit of excitement earlier when a wooden Ketch, that sank near Emsworth on it's mooring, was towed in and then lifted onto the hard. It looked really forlorn, mud streaked, with seaweed and a mooring buoy in the rigging; certainly sad for the owner.
Despite the appalling weather and excesses of the holiday period we've managed to get a surprising amount of work done and plans are now well advanced for a very active couple of months that should get the Contessa something closer to shipshape than the stripped out hull that she has been until now.
The really boring stuff seems to be behind us now that the preparation is done and all the lockers are painted out. It's much more interesting and satisfying to be putting stuff into the hull than forever taking it out. The pile of equipment left by Father Christmas has now shrunk as parts are progressively fitted and the shell becomes more like a working yacht.

The shore power installation is now virtually complete with most of the kit fitting neatly into what was the pilot berth and is fast becoming a storage locker for big stuff like the inflatable tender. The consumer unit is accessible (but out of the way) when the RCD blows, and switches for the power supply and water heater are easy to reach. The power supply (complicated thing!) is at the far end which would be difficult to monitor if there wasn't a remote controller that's going to be located in the navigation area. There's sockets in the galley for the kettle and plenty underneath the berths for heaters and the inevitable hair dryer.
The engine compartment is looking much healthier in Danboline grey rather than soot black and ready to do the job with the fuel and water filters now in place. The shiny insulation should finish it all off but that's not going in until the engine is in place once more to keep it in pristine shape.
It's been rather pleasant working inside the Shed whilst the weather has been so relentlessly wet even if a bit antisocial. The yard has been relatively quite, I can only guess that it's only owners that would work over the holiday period and who would want to do that outside in these contains! There was a bit of company for a few days when Dale and Alan (The engineers) worked on the Hayling Ferry between Christmas and New Year; apparently it's the only time its not in commission.
 After weeks of warmth the hull is distinctly chilly, the red pads have done their job and have been switched off. It's easy to see that the hull has largely dried out by the moisture readings scribbled and crossed out all over the surface. They started off at about 20 and are now, in the main, below 5 which is where they should be before the next steps can be taken. There are just a few places where it's about 10 that are are not easy to cover with a patch and will be dried out with heat lamps over the next few weeks. As it happens there's no rush to get her finished off and out of the shed as she's fourth in line behind some bigger hulls, including a rather large lifeboat outside. Just as well as there's been a slip up and the new port lights, which are on six weeks delivery, have only just been ordered. It's all rather convenient really as it means that I'll be able to work on her in the dry over the Christmas period which will be great even if it's a bit dusty.
Now that the hot patches have gone the painting of the lockers and bilge can get going, cooking fresh Danboline is not the best way of getting a good result. After clearing out the forepeak and stern it's apparent how much painting needs to be done, there's acres of scruffy GRP to cover! Unfortunately the original owner who did the fit out had short changed this aspect and too many areas such as the stern lockers have to be painted out for the first time. It's not all hard work and surprisingly satisfying when it's done; the insides of the lockers gleam after a fresh coat of paint making the effort well worth while. Keeping with tradition it's now consistently white for the lockers above the waterline and grey elsewhere, what a difference!
The highlight of the weekend was discovering the burger van just outside the yard which does some excellent bacon rolls for lunch which went down really well with a generous mug of tea! Just seeing a few other people makes a welcome break from solitary confinement down in the bilges.
Prior to painting I've tried to make sure that the holes in the dividers and bulkheads are all there for the cable and piping runs. The wiring is fairly easy to locate, the hot & cold water supply not too difficult either but the hot water from the boiler is a bit more of a challenge. Apparently plastic, push fit, domestic piping and fittings are the only real choice as the water temperature is 80 degrees centigrade. The only flexible piping that can stand this temperature is some special silicon stuff which is about £25 per metre, don't fancy using much at this price the way the budget is going! As space is so limited in key places, it's going to have to be a combination of the two; it's guesswork a this stage though, be interesting to see how it works out in practise.
I've spent quite a bit of time over the past few weeks on the Contessa forum gleaning some useful tips from the experience of other folk who've done what we're planning before. The technical papers have proved to be useful, it's interesting to know exactly what's under the floorboards and how I should have taken the windows out, for example. I'm particularly indebted to the owner of Waratah who has fitted a fridge, heater plus hot water system and found some ingenious places to locate the bits. He explained how the compressor unit can be fitted behind the cooker, the calorifier in the locker and the heater in the engine compartment - thanks Paul! Much of the planning is now complete, it's just a question of getting bits at the lowest price and getting on with it.
This weekend's work has been a bit on the boring side cleaning out all the lockers, rubbing them down and preparing them for some coats of Danboline. They all look rather sad so a fresh coat of paint everywhere should make quite a difference.
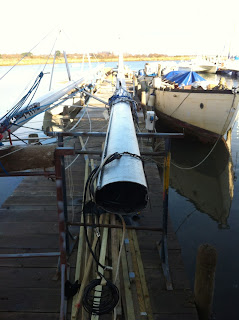
For the first time I've been able to find out where the mast is, and, despite it being in a rather precarious position, take a good look at it. Not the best of news, on close inspection there's more work than I'd anticipated that has to be done. The survey had identified that no wedges had been fitted between the mast and the deck allowing it to move and wear underneath the waterproof gaiter; the surveyor had assured me the mast could be repaired without difficulty. What wasn't mentioned was that there was corrosion under several of the fittings, the standing rigging was undersized and that the lights needed to be replaced. It's an Isomat mast rather than the usual Kemp mast and, of course, it's no longer possible to get sections or spares for it. One of the riggers that took a look just wanted to sell a new mast, the other was more helpful and accommodating but it was clear that there's a limit to how much patching is economic. I'll have to take off the fittings, let him see how far the corrosion has gone and then we'll know if it can be repaired with a sleeve or not. I'm hoping it can, a new mast would add a significant chunk to the already strained budget!
A further hindrance came in the shape of the bulkhead compasses; one was leaking oil, the other badly chipped. They both looked in need of replacement, which, according to the forum was easy using a Contest 130 which was of similar size. Trouble was that Plastimo (the manufacturers) had gone bust and although they were probably going to be bought out, production had ceased for a while at least! Few chandleries had any stock and the bargain prices had evaporated so to get a pair I had to pay premium prices - or wait six months or more to see if production re-started; not a great choice.
The weather this weekend has been appalling, wind, rain and floods everywhere! It's a good job I've been working in the Shed protected from the elements and kept nice an warm by the number of HotVac patches stuck over the hull. The fibreglass is gradually drying out, most of the starboard side has a moisture reading that's below 5 now so the patches have been moved over to the port side.

The challenge this weekend was to clean out the engine compartment and sort out the cockpit locker, a really filthy job I wasn't looking forward to. In the end clearing out the old, oil sodden engine insulation wasn't too difficult but crawling into the compartment to clear out the old exhaust gear was more challenging. Reaching right up to the deck drains to clean up then de-grease the compartment was not my idea of fun but it was satisfying to see it look so much better afterwards. Draining the fuel tank was heartbreaking, over 40 litres of diesel thrown away! Fortunately it was relatively easy to disconnect everything, move the tank around, and get access to the top which was needed to fit new piping later on.
With most of the stripping down completed it's time to buy some new bits to put back and one of the first priorities is to sort out the electrics. With the DC stuff now on order so it's time to get the electronics so that James, the chippie, can re-build the navigation area. We'd decided on Garmin kit at the boat show because it looked nice, seemed to fit what was needed well enough and good value. The Marine mega store had a special sale on for GM10 instruments, the displays being at half price, so it was off to Port Solent to do a deal. Not being particularly interested in a plotter as I prefer paper charts I settled for a Garmin 551 model which is pretty basic but still better than a straight GPS. We'd already bought a ICOM M91D portable VHF so it was natural to buy a IC423 fixed VHF which has the same user interface.

After struggling home through the pouring rain with a pile of boxes a mile high I sat down to work out exactly where the NMEA 2000 network was to go, what shape it was to be and what additional bits were needed. It took most of the afternoon to fathom this out from the "manuals" which were not particularly helpful but after many trips to various sites on the internet it soon became clear that a backbone network from the mast back to the nav area and then on up to the instruments was required. By using field attachable connectors it was going to be possible to thread the micro cable up to the instrument housing, negating one of the earlier concerns about the rather tortuous cable run.
Now all we need to do is make it happen!
Although it's tempting to just crack on with the work that needs to be done, it's become really important to take some time out to plan in detail exactly what we're going to do over the next few weeks. It's relatively easy to take things out but now we're faced with having to start to put back things into the boat, we want it to all work ok and need to keep the cost down. The two major areas to be refitted are the nav area and the galley, to get these right the wiring and the plumbing have to be thought through and planned out.
I've defined two almost equally demanding scenarios to size up the electrics, a couple of summer nights at anchor and a long night passage. We're not keen on starting up the engine too often at anchor so the battery capacity needs to be enough to keep the power hungry fridge working which is pretty demanding although the other loads still add up too. It all comes to 100 ampere/hours which is much the same as the other scenario, sailing across the channel with navigation lights and all the electronics on. I've learned from bitter experience that you don't discharge even deep cycle batteries more that 50% if you want them to last so that means we need 200 amp/hours of capacity but originally there was only one 110amp/hr domestic battery and a smaller starting battery. There isn't room under the pilot berth for a second one so the solution is to locate another in the forepeak which will be useful to power the anchor winch which is close by.
 Having sorted this out the rest of the design is straight forward although a bit tedious as i've had to convert all the wiring diagrams from a PC (Visio) to a Mac (Omnigraffle). I'll be using the same Blue Sea kit from Merlin that proved to be so reliable on Alize. It's a bit of a jigsaw puzzle to find enough space to mount the control panel, Plotter, VHF and Tank Tender on the woodwork adjacent to the chart table but it proves to be possible without loosing what was the bookcase. I'm rather keen on keeping this for all the wiring and fuses with a hinged lid to cover it making it all very accessible, especially if something goes wrong! With detailed drawings made we can get the chippy started on filling in the holes and recovering what is currently a very sad part of the interior.
The main constraint on the galley is the distance between the refrigeration unit and the cold plate. We're going to have to have a cold box fabricated from GRP to fit which dictates the size of the cold plate (the smallest we can get), I'm hoping to be able to locate the compressor in the sail locker but it will have to go aft of the fuel tank if we're to fit the calorifier in the convenient spot in front of the tank. This means there's no space for the heater so that's going to have to go at the aft end of the pilot berth after all. It's yet another jigsaw puzzle to resolve and one that I don't want to get wrong! Fortunately there seems to be sufficient space for the piping and wiring runs even though the hull is never far away limiting space at various pinch points.
Now we've agreed on all the parts needed and got some quotes for the work I cant do myself it's time to update the budget spreadsheet. Naturally the bottom line is more than we'd like to spend so there's going to have to be a round of cost trimming which all takes so much time....


